ProMS
Documentation.
Welcome to the ProMS - Project Management System
ETIQUETTE
To keep things running smooth and avoid clutter, there are a few simple rules of etiquette you are asked to follow:
- DO NOT DELETE anything you didn't create (everything can be recovered)
- Update the task / ticket status when you begin work on it and any time the status changes
- Be civil in all communications
- Include your name AND the current date to all files uploaded
OBJECTIVE
The ProMS platform is intended to streamline our communications and activity. As a team, we can work together to identify, assign and monitor progress on all our projects.
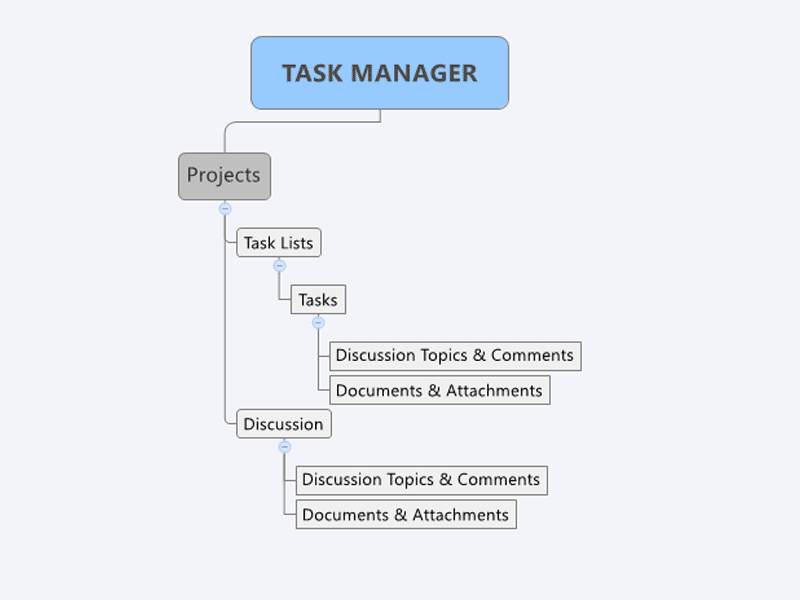
While it may seem complex, if you look at the org chart, your activities are clearly defined. All activity is grouped under Projects. Projects contain Task Lists, which in turn contain individual Tasks.
This documentation explains how to use each component of the system. From setting up a project to completing a task and uploading attachments, everything is covered below.
The system only works if we all use it and update our progress regularly
Please make it a priority to monitor your notifications daily (by email OR by logging in).
If you experience any issues while using the platform, please send a ticket to IT.
If you have any suggestions for improvements, please send a ticket to IT.
Quick Links.
Use
Cases.
SETTING UP A NEW PROJECT
When do you set up a new project?
When you have a new project starting OR grouping of tasks and you need to track its related tasks / files / activity / discussion
Before setting up a new project
1) Ask yourself if the the information you wish to enter into the system requires a new project be created.
2) Is the information better suited for a Task List under an already existing project?
How do you start a new project?
- Log into the ProMS
- Click on the PROJECTS ☴ link in left side navigation
- Click the NEW PROJECT BUTTON ☴
- Enter your project details and save your new project
After creating your new project
- Add the appropriate team members to your project (currently by sending a Ticket to Cooper in IT) ☴
- Click on YOUR PROJECT ☴ from the list of projects
- Click on NEW TASK LIST BUTTON ☴ and enter the required details and deadlines for this new task list. Save your new task list.
- Repeat for any additional task lists.
- Click the NEW TASK BUTTON ☴ to enter the required details and assign this task to the correct team member. Repeat for all tasks, adding new tasks to their related task list.
DISCUSSION & ATTACHMENTS ☴: All discussion related to a project should be held within the comment system as opposed to using email. Keeping conversation "in house" is more secure and provides a searchable, chronological record. This is more efficient than our current methods.
ALL APPROPRIATE DOCUMENTS related to a project should be uploaded to the project through the discussion tab. This keeps everything accessible in one location when a team member needs them.
Monitor your teams progress visually using the Gantt Chart. To see a projects Gantt chart:
- Click the PROJECTS ☴ link in the left side navigation
- Click on the PROJECT TITLE ☴ from the list of all projects
- Click on the GANTT TAB ☴ to view the Gantt Chart for this project
ADDING A TASK LIST
When do you add a new task list?
You add a new task list when you have a NEW group of tasks to assign to the team that:
A) Have NOT already been assigned to an individual
B) Are NOT related to an existing task list
Before adding a new task list
Make sure the tasks you want to add are not applicable to an already existing task list and project. To avoid clutter, only create a new task list when absolutely necessary.
How to add a new task list
- Click on the PROJECTS ☴ link in the main navigation
- Click on the PROJECT TITLE ☴ for the project you want to add a task list to
- Click on the NEW TASK LIST BUTTON ☴ and enter the required details and due dates for this task list. Save the task list. Repeat for additional task lists.
After creating a new task list
After creating your new task list, you will need to add related tasks ☴. See the next use case for instructions on adding new tasks.
Important: Be sure to set appropriate timelines and due dates for your tasks and task lists so they can be tracked using the projects Gantt Chart.
ADDING A TASK / ASSIGNING A TASK
When do you add a new task?
You add a new task any time you need to track an activity related to a particular project.
You do not need to create a project or task list in order to add a task. You can add a new task to any existing task list.
Before adding a new task
Determine that this activity has NOT already been assigned to a team member in any existing project or task list
Identify the person responsible for completing the new task
Identify the start date and due dates for the new task
How to add a new task list
- Click on the PROJECTS ☴ link in the main navigation
- Click on the PROJECT TITLE ☴ for the project you want to add a task to
- Click the NEW TASK BUTTON ☴ to enter the required details and assign this task to the correct team member. Repeat for all tasks, adding new tasks to their related task list.
After adding a new task
Add extra detail to the specific task by creating a discussion topic ☴ and conversation within that task.
By leaving a new comment, you can alert additional team members to the task (as opposed to just the individual originally assigned)
Upload / attach all documentation and related files for this specific task IF:
A) The document or file is SPECIFICALLY RELATED to this task
B) The document or file is NOT better suited to be attached to the greater project discussion area.
YOU HAVE BEEN ASSIGNED A TASK
When you have been assigned a task within the system, you are notified by email. Clicking the link provided in the email will take you to the detailed view of your task.
The first thing you should do is edit the TASK STATUS ☴ to reflect your current action. There are a number of status options to choose from, select the most appropriate. Example: When you begin work, change the status from ASSIGNED to IN PROGRESS.
Next you want to verify the due date is accurate ☴. If it is not accurate, adjust it as necessary.
Next you might want to SET A TIMER to track the time spent on a particular task (this is not required):
- Click the START TIMER BUTTON ☴ in the top right corner of any project
- Click the TIMER ICON in the header to STOP THE TIMER ☴ when you are finished work on a particular task.
Work on the task until completed. If you require assistance from another team member:
- Include them in a discussion ☴ and make the request there.
- Create a new task ☴ and assign it to them if necessary.
Complete the task. Check the box in the top left corner of a TASK TILE ☴ when viewing a task list in any project.
YOU HAVE COMPLETED A TASK
When a task is completed, you must update the TASK STATUS ☴ to reflect your progress.
- Click the PROJECTS ☴ link in the left side navigation
- Click on the PROJECT TITLE ☴ of the project that contains your task
- Locate your task in the appropriate TASK LIST ☴
- Check the box in the top left corner of the appropriate TASK TILE ☴ to mark your task complete.
ORGANIZE AND TRACK PROJECT MATERIALS & DISCUSSION (files - attachments - comments)
The system is designed to archive all documents related to projects and tasks. Instead of sending documents back and forth through email, which is clumsy at best, uploading them within the system is a much more effective option. ☴
Examples of documents that can be uploaded include (but are not limited to):
Site plans, reports, budgets and projections, internal documentation, documents requiring signing, training tools, graphics, logos, etc.
Examples of usage scenario 1:
Sam sends out an updated version of a time sensitive document requiring 4 signatures. Half the replies have signed the outdated version and now a followup request is necessary.
Had the documents been attached to a project in the system, everyone would have been notified by email of the new document and instructions. Locating, signing and re-uploading the document to the system is trackable and alerts Sam to your submitted signatures.
IMPORTANT: When attaching files to a project it is importat to follow a few naming conventions:
- Include YOUR NAME and the CURRENT DATE as part of the file name - This ensures we can select the most recent version when downloading for use. Example: some-kind-of-descriptive-file-name-cory-may-31-2020.pdf
- If uploading a second / third etc. version of a file, ALWAYS update the DATE in the file name
- If re-uploading a file that you have made changes to and that was uploaded originally by someone else, replace their name with YOUR NAME AND replace the date with the CURRENT DATE.
Screenshots
& Functionality.
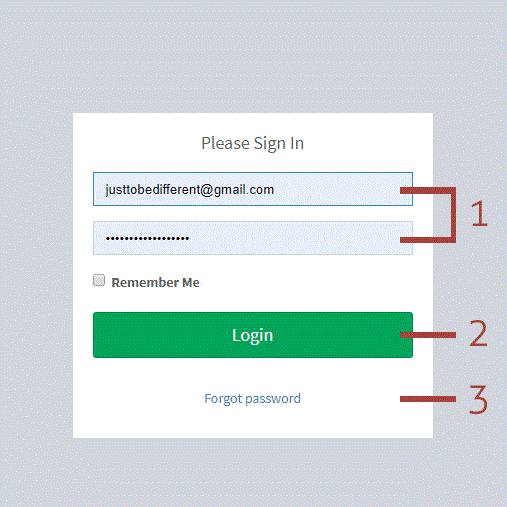
Login:
1) Enter your email address and the password you were given into the proper fields.
2) Click the login button to enter the Task Management System.
3) Click the forgot password link if you have forgotten your assigned password or wish to reset your current password.
Forgot Password
1) If you have forgotten your assigned password, recovering or changing it is easy.
2) Enter your email address in the appropriate field and click the send request button. You will be emailed instructions for setting up your new password.
3) Click the login to account link to login through the normal way if you have reached this page by mistake.

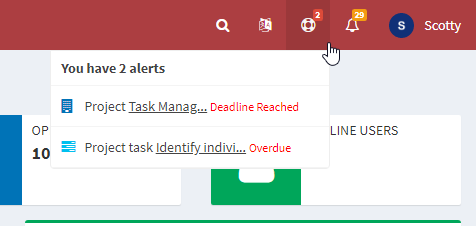
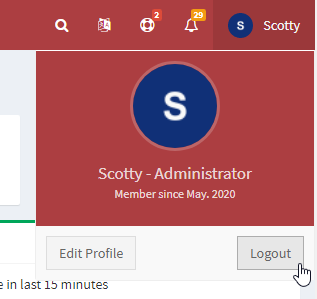
1. Header alerts & Navigation
Once logged in, you will find all alerts and notifications icons in the header, located in the upper right corner of the dashboard. Clicking either icon will give you an overview of the latest items in each category. The notifications area includes a link to view all your notifications.
If you click on your username / avatar, you will be shown options to logout or edit your profile details.
Navigation
The navigation area is the dark grey sidebar on the left side of the screen. There you will find links to all of the main functions of the dashboard.
- Dashboard: Displays an overview of all your assigned projects, tasks, activities, tickets and events.
- Projects: Takes you to a list of all projects you are assigned to.
- Activity: Displays a list of all activity related to your assigned projects. Both yours and other team members.
- Timesheet: Shows you a breakdown of all time logged in the system.
- Events: A calendar of all events you have scheduled or have been invited to.
- Notifications A complete list of all notifications you have received within the system.
- Tickets: A list of all tickets you have opened or that have been assigned to you.
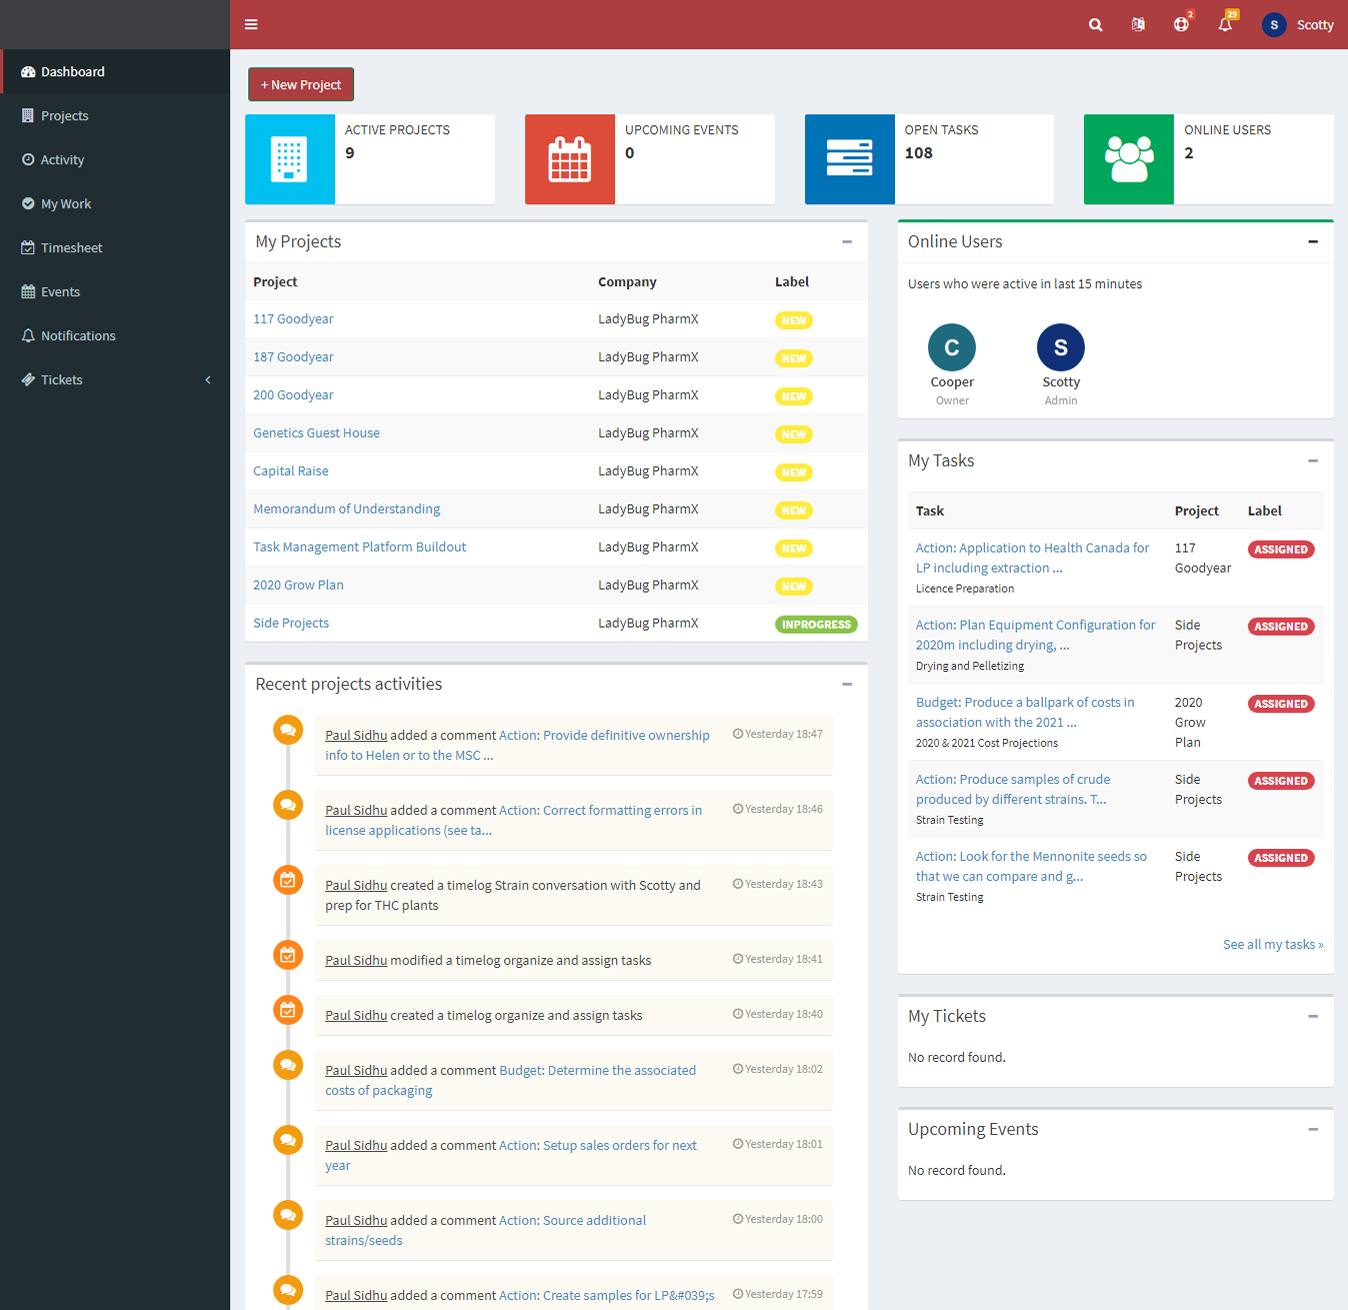
2. Overview
In this area you will find a snapshot of the active projects, upcoming events, open tasks and recent online users.
3. Projects
A clickable list of all projects you are assigned to.
4. Tasks
A clickable list of all your assigned tasks.
5. Recent Activities
A list of the most recent activity by you and other team members, related to your assigned projects.
6. Tickets
An overview of all tickets you have opened or that have been assigned to you.
7. Events
A preview of all events you have scheduled or have been invited to.

This area gives you an in depth view of all projects you are assigned to.
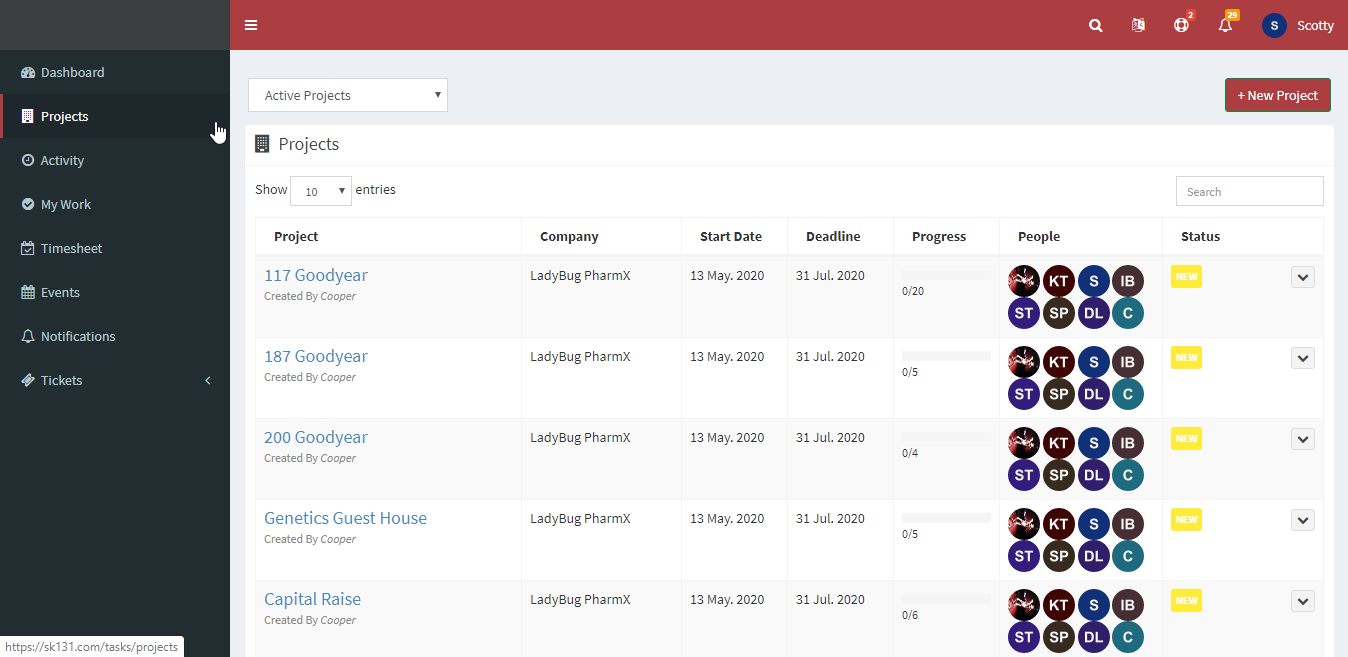
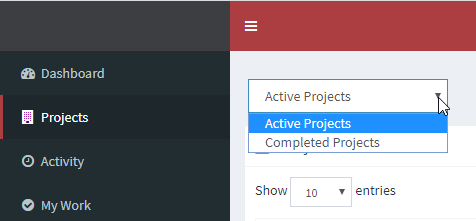
1. Filtering the Project View
You can change the view in this projects tab and select between active projects and closed projects.
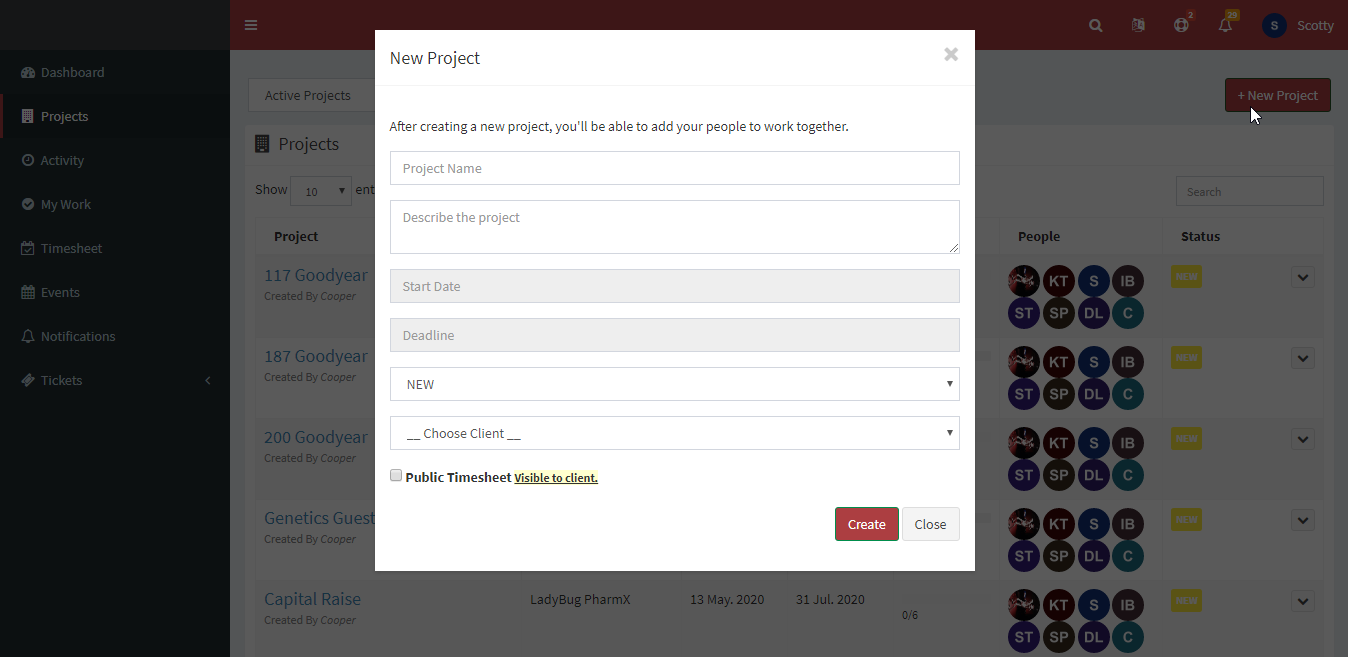
2. Starting a new Project
To start a new project, click on the New Project button. You will be shown some fields in a pop up that are required to be filled.
Give the new project a name and a brief description. You must also include a start date and and end date for the project.
Adjust the status of the project as necessary: Choose from New / In progress / Paused / Canceled
Click the Create button to save the new project.
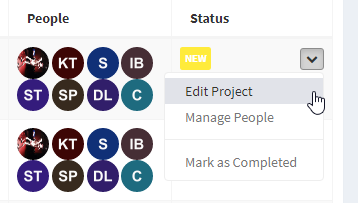
3. Editing a Project
Editing a project is done by selecting the option from the drop down menu to the right of the project name.
You will see the same fields shown during project creation. Edit as necessary then click the Update button
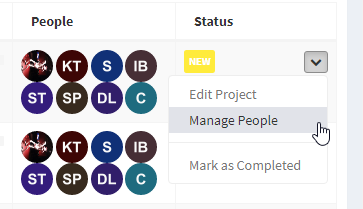
4. Assign Project Members
The final step is assigning team members to your project. To add team members, please send a ticket to Cooper in the IT department with a list of members to be added to your new group.
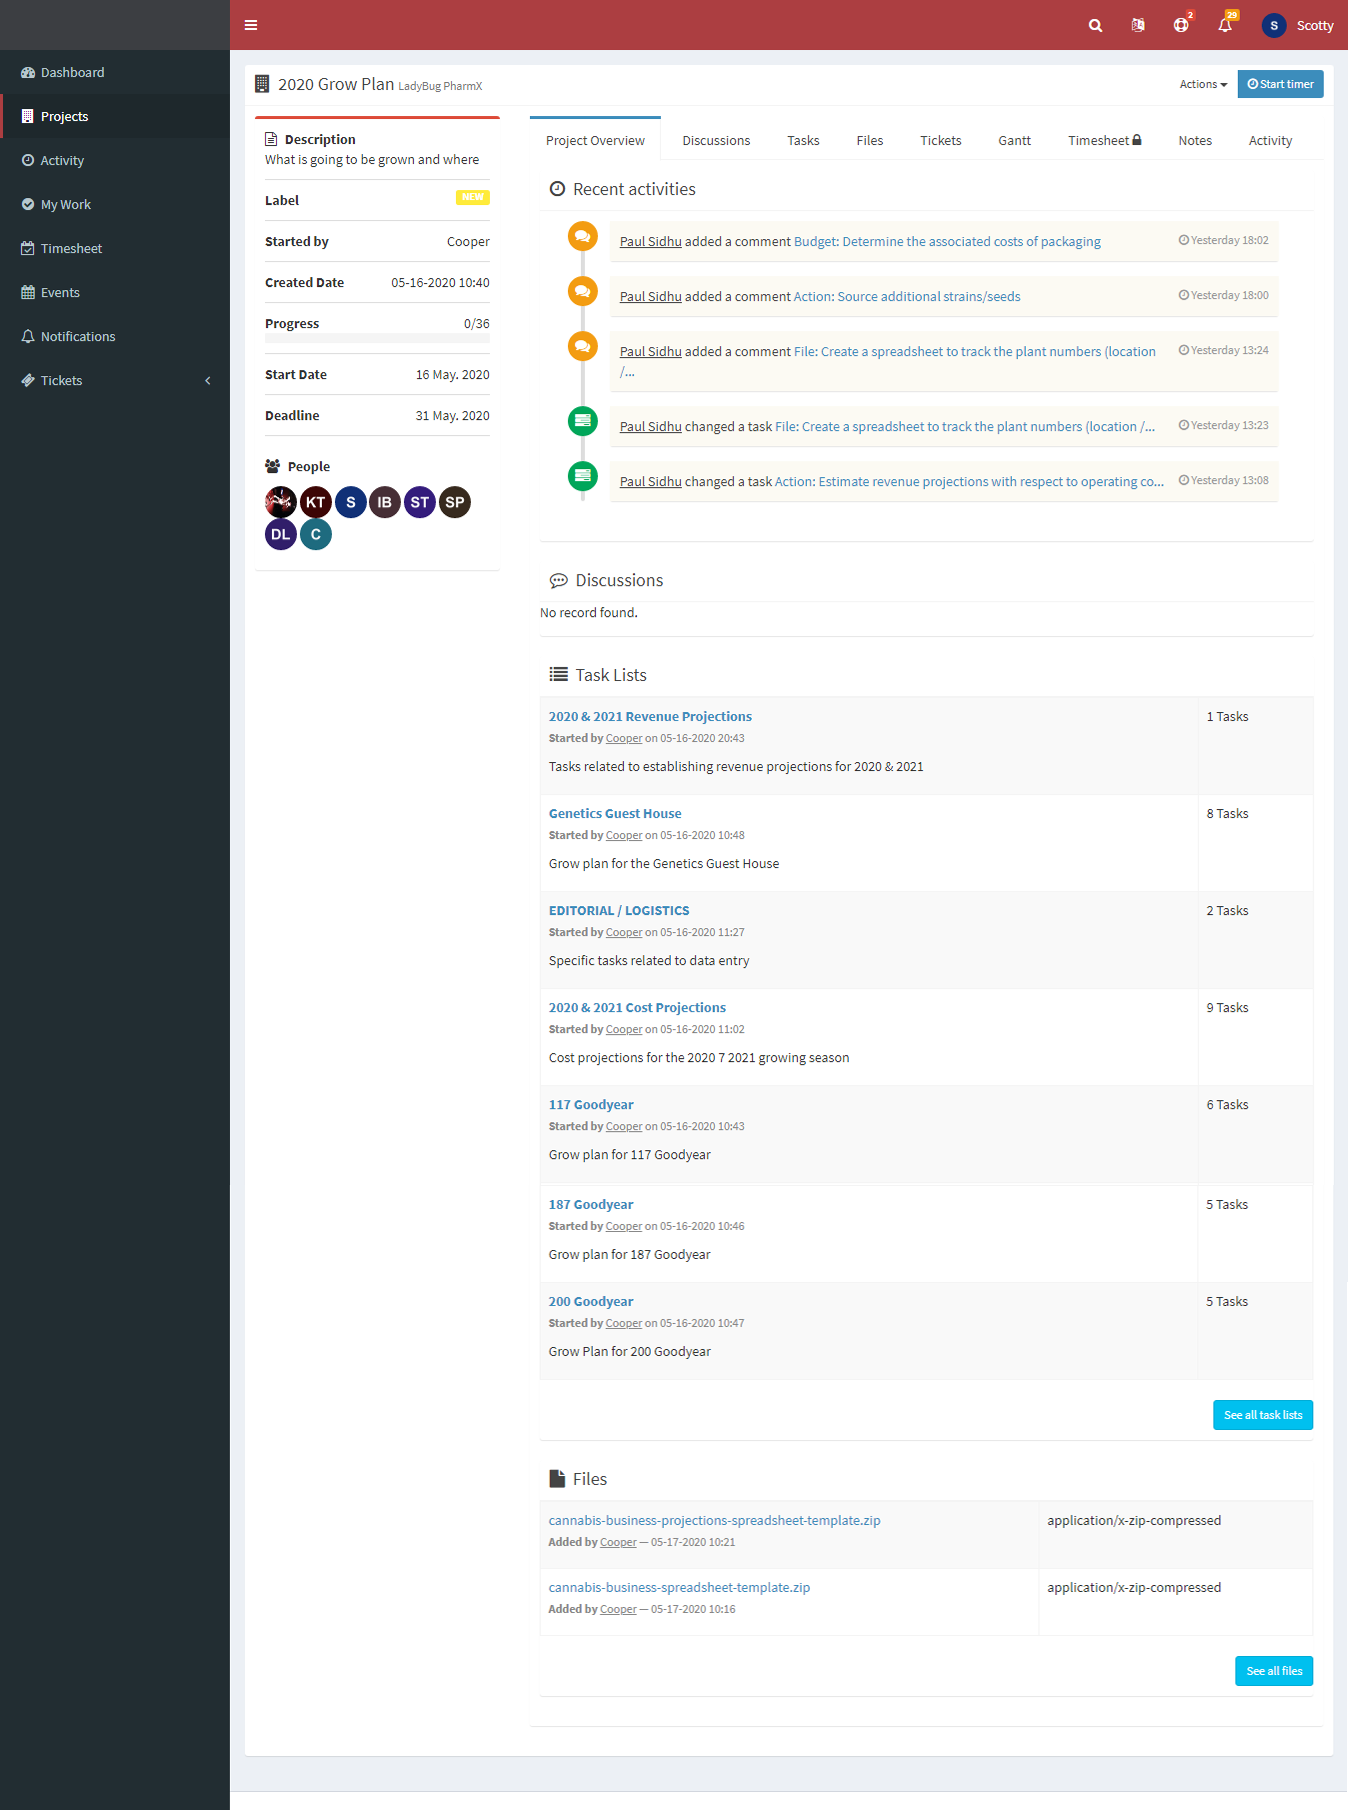
Project Details
This is the general overview of the currently selected project. In the top left corner you will find some information about the project itself, including name, description, creation date, end date, active members and task progression.
Overview
This is the default view for this area. You will find a selection of the most recent activities related to your assigned projects, along with any discussions, task lists and files that have been uploaded.
Each record is linked. Clicking on any of these links will take you to the record for a more detailed view or interaction.
This is where you can carry on conversations related to the current project.
Topics created here should be for high level conversation as opposed to those related to specific tasks (low level).
*Lower level conversations should be started from within a specific task in order to have them linked*

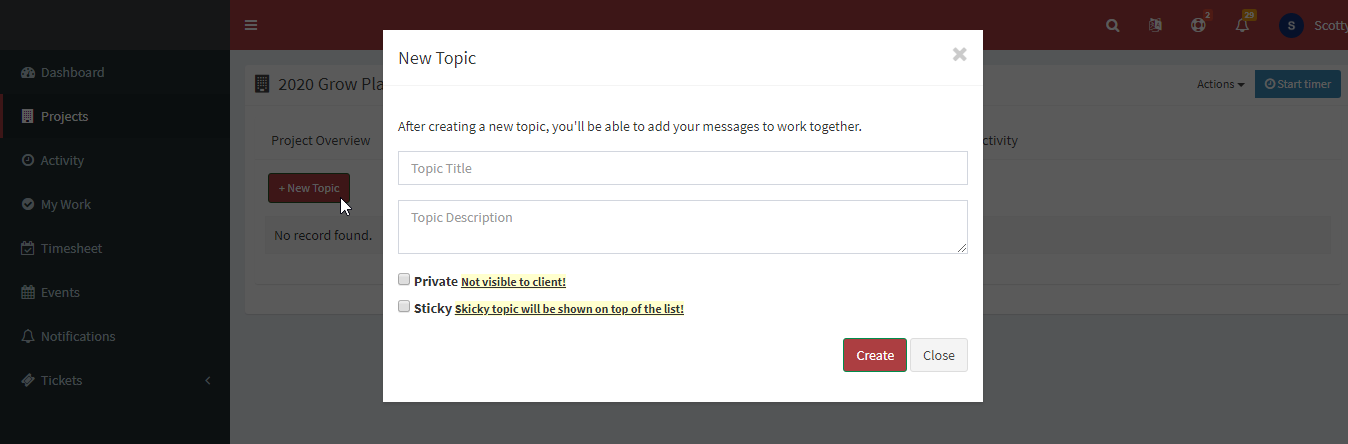
Creating a New Discussion Topic
To start a new discussion related to a project, you must click the New Topic button, found in the top left corner.
- Click the New Topic button and you will be presented with a pop up showing the required fields.
- Enter the topic title
- Enter a short description of the topic
- Check the box beside "Is Sticky" if you want to pin this topic to the top of the discussion list.
- Click the Create button to finalize you new topic. It will now be visible and clickable in the main discussion list.
- Click on the newly created topic link and add to the conversation.
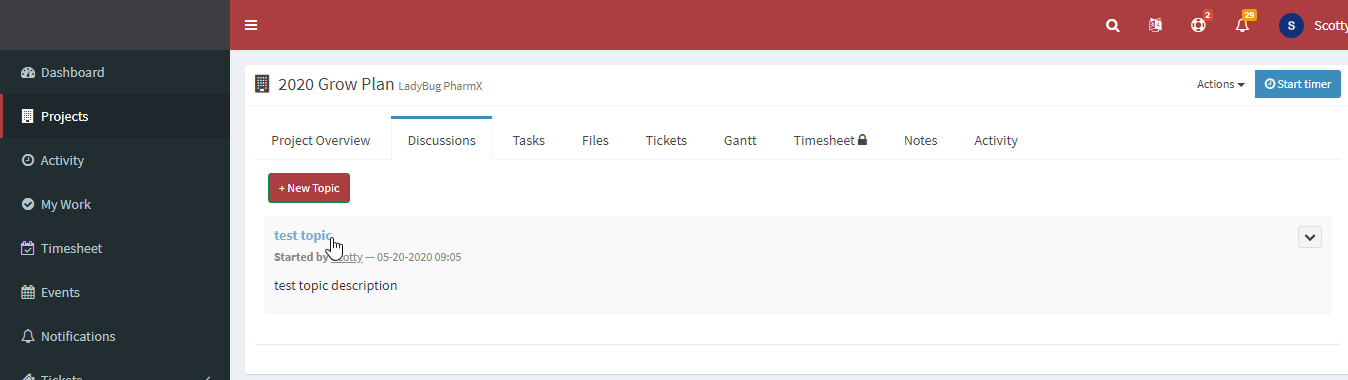
Join the conversation
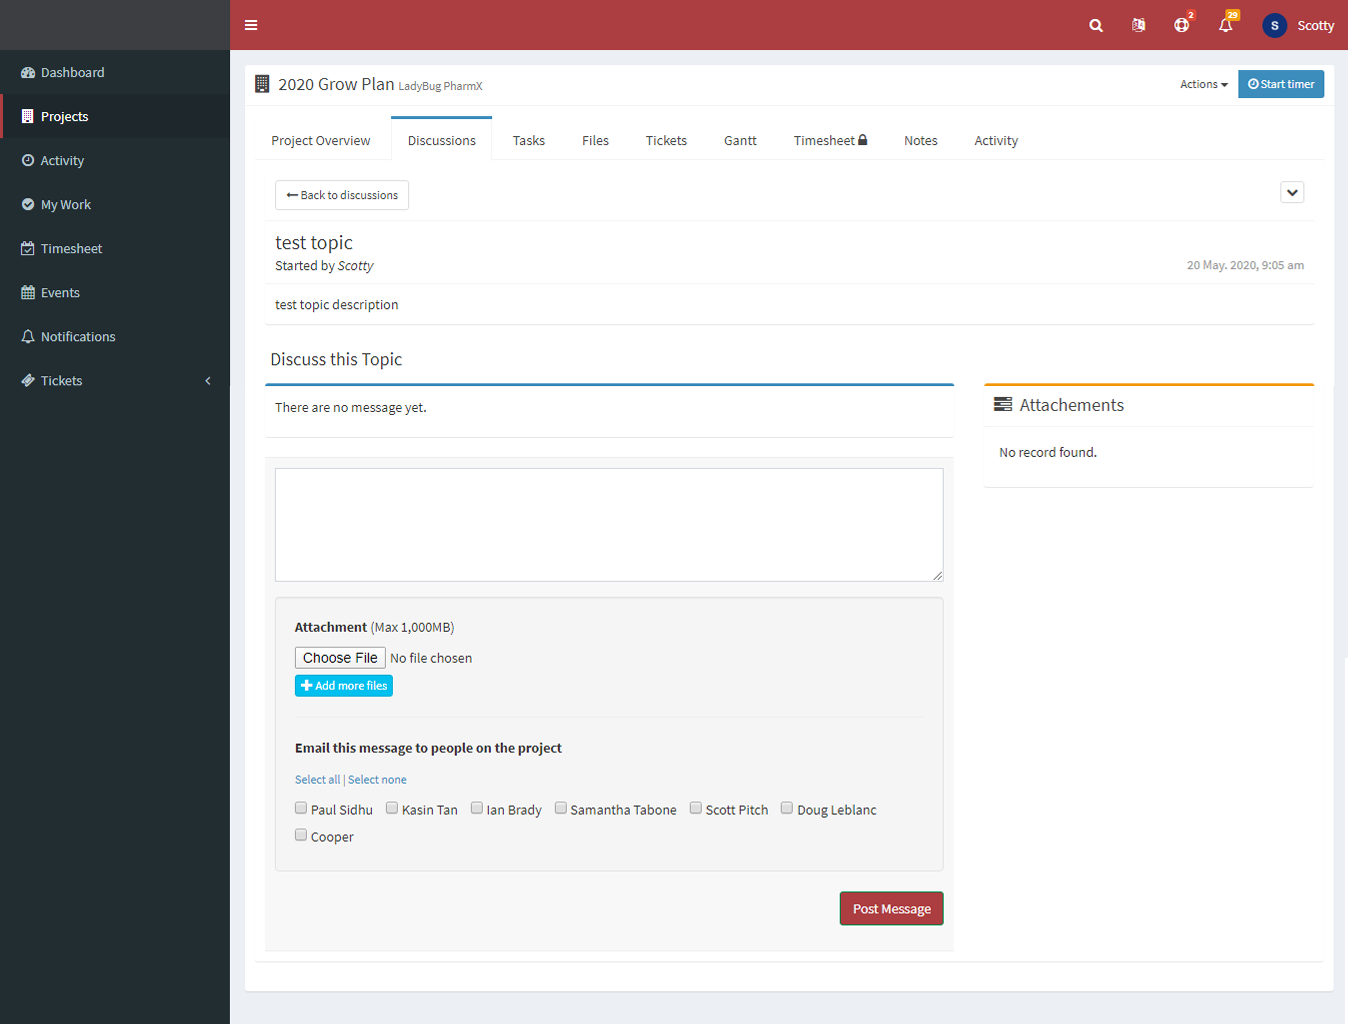
To contribute to a conversation, click on the Topic title. You will be taken into a detailed overview of that topic.
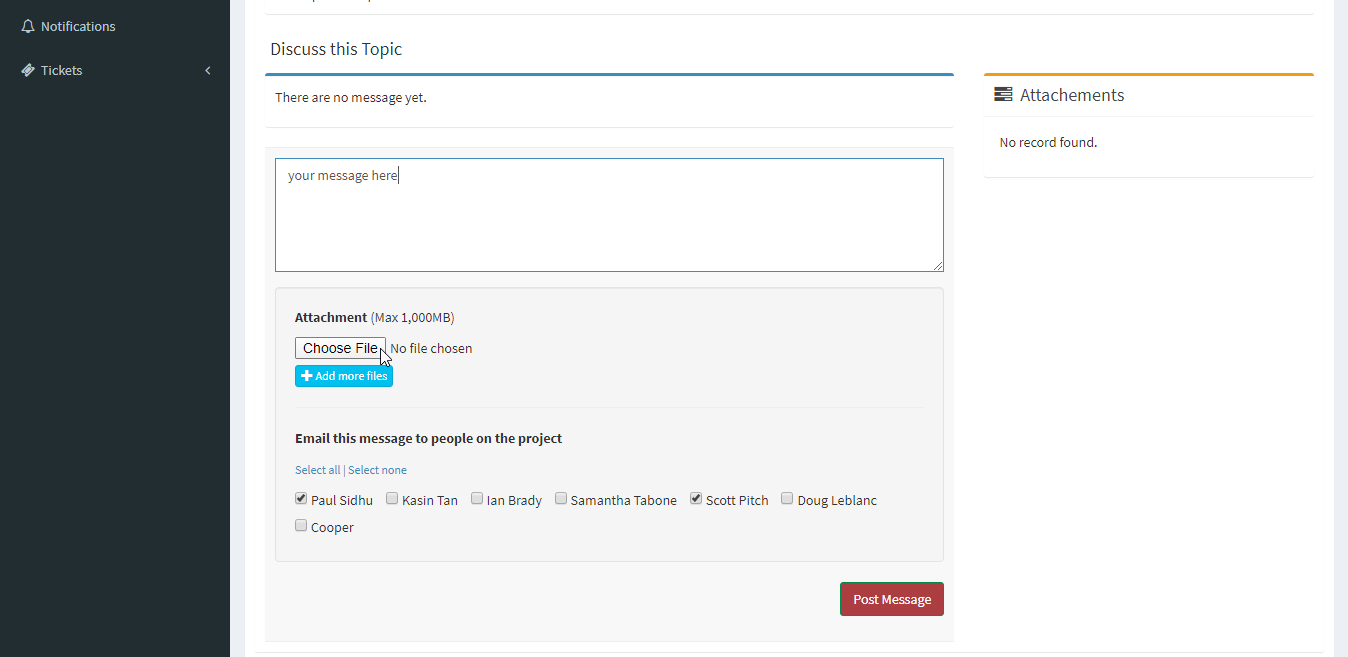
Comments & Attachments
Once inside a topic, you can post new comments, reply to existing comments and attach any related documents. You can alert all team members to your comment or document at the time of submission.

Start a Project Timer
When viewing any part of a project, a button will appear in the upper right corner that says "Start Timer". Clicking this button will begin a timer and can be used to track the time spent working on tasks within the project. You will also notice a new timer icon in the header (small clock).The button, when clicked, will also change to read "Stop Timer".
When the Stop Timer button is pressed, you will be presented with a pop up that has some required fields for identifying information.
You can also stop the timer / cancel the timer by clicking on the timer icon in the header
This tab gives you an overview of all Task Lists currently active for the selected project. You can click and drag any Task List to rearrange the order on your screen.
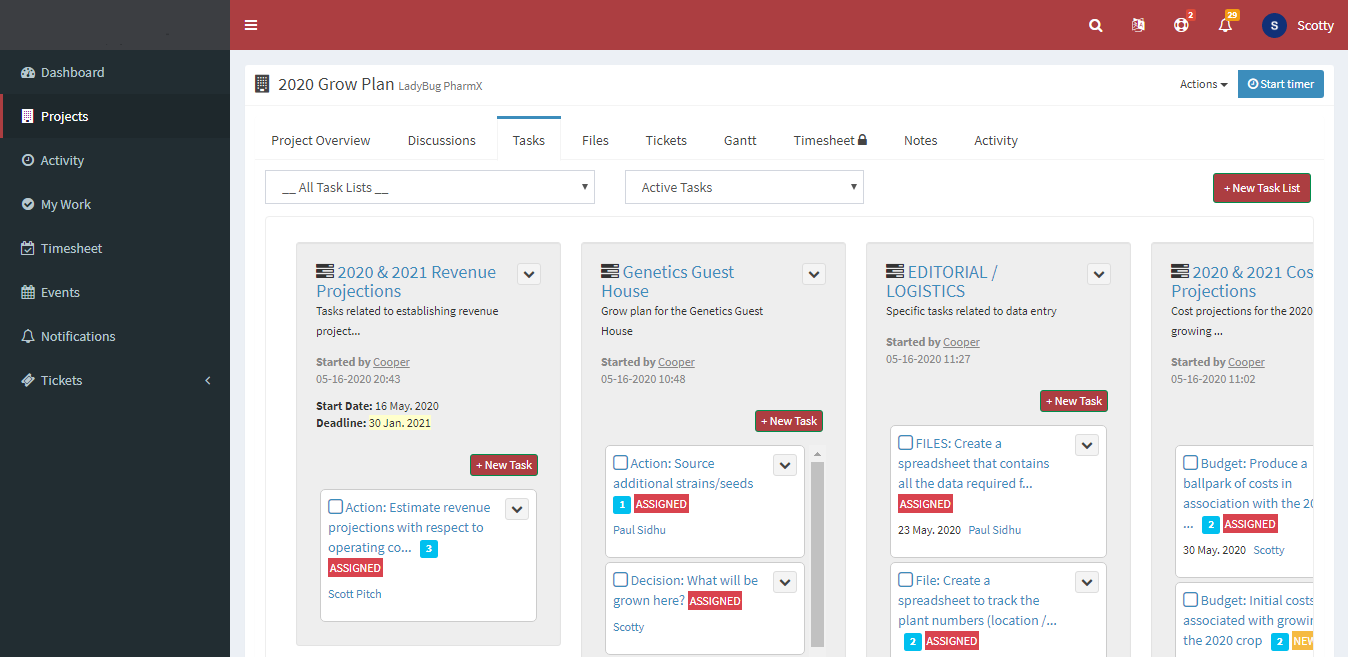
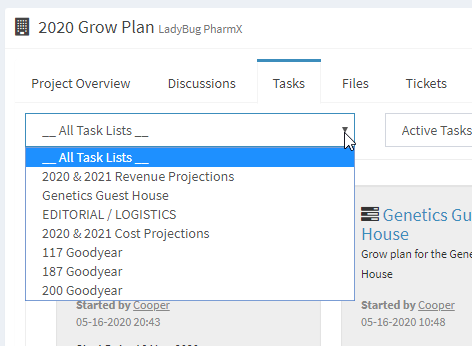
Filtering Tasks
At the top of the dashboard you will find options for filtering the records dispayed. You can view all Task Lists at once or isolate your view to a single Task List. Alternately, you can choose to view All Tasks, Active Tasks and Completed Tasks.
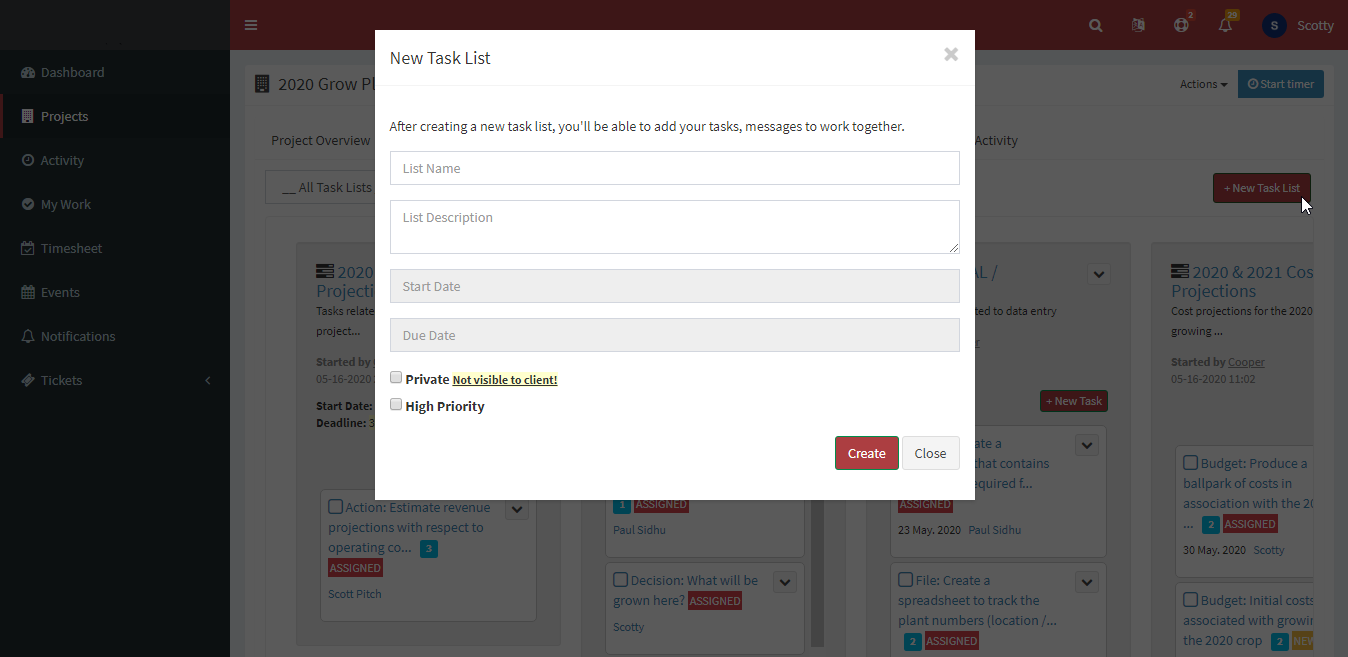
Create a New Task List
In the top right corner of this tab you will find the New Task List button. Click the New Task List button to create an empty list. You will be shown a pop up with all the required fields.
Name: Name your Task List
Description: Enter a short description of your Task List
Start / End Date: Choose start and end dates for the list if applicable.
High Priority: Check this box if the Task List is High Priority.
Create: Click the create button to finlize your list.
You can now add tasks to the list you have created.
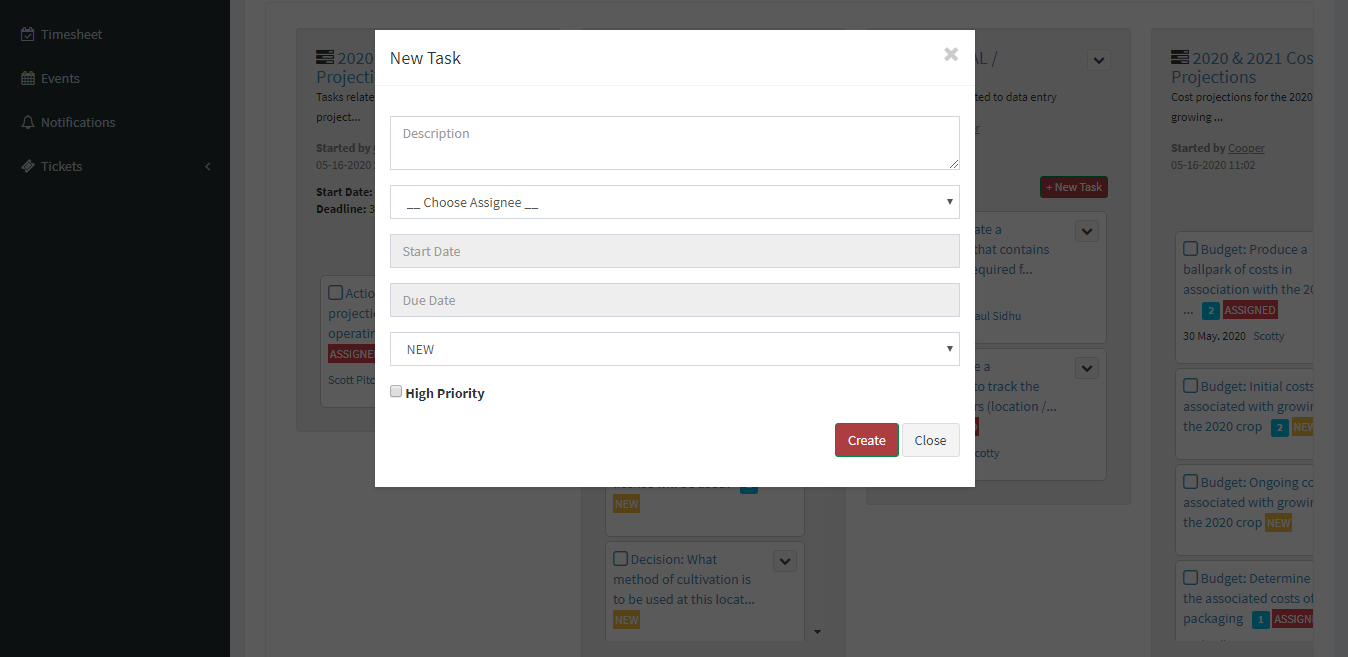
Create a New Task
In the upper right corner of the dashboard you will see the Create Task button. Clicking this button will display a pop up with all the required fields.
Description: Enter a short description of the Task. You can add more detail inside.
Assignee: Choose a team member to assign your Task to. (Notify other members using the discussion area)
Start / End Date: Choose a Start date and a Due date for the Task.
Task Status: Choose an appropriate status from the dropdown provided.
High priority: Check this box if your Task is considered High Priority.
Create: Click the Create Button to finalize your Task.
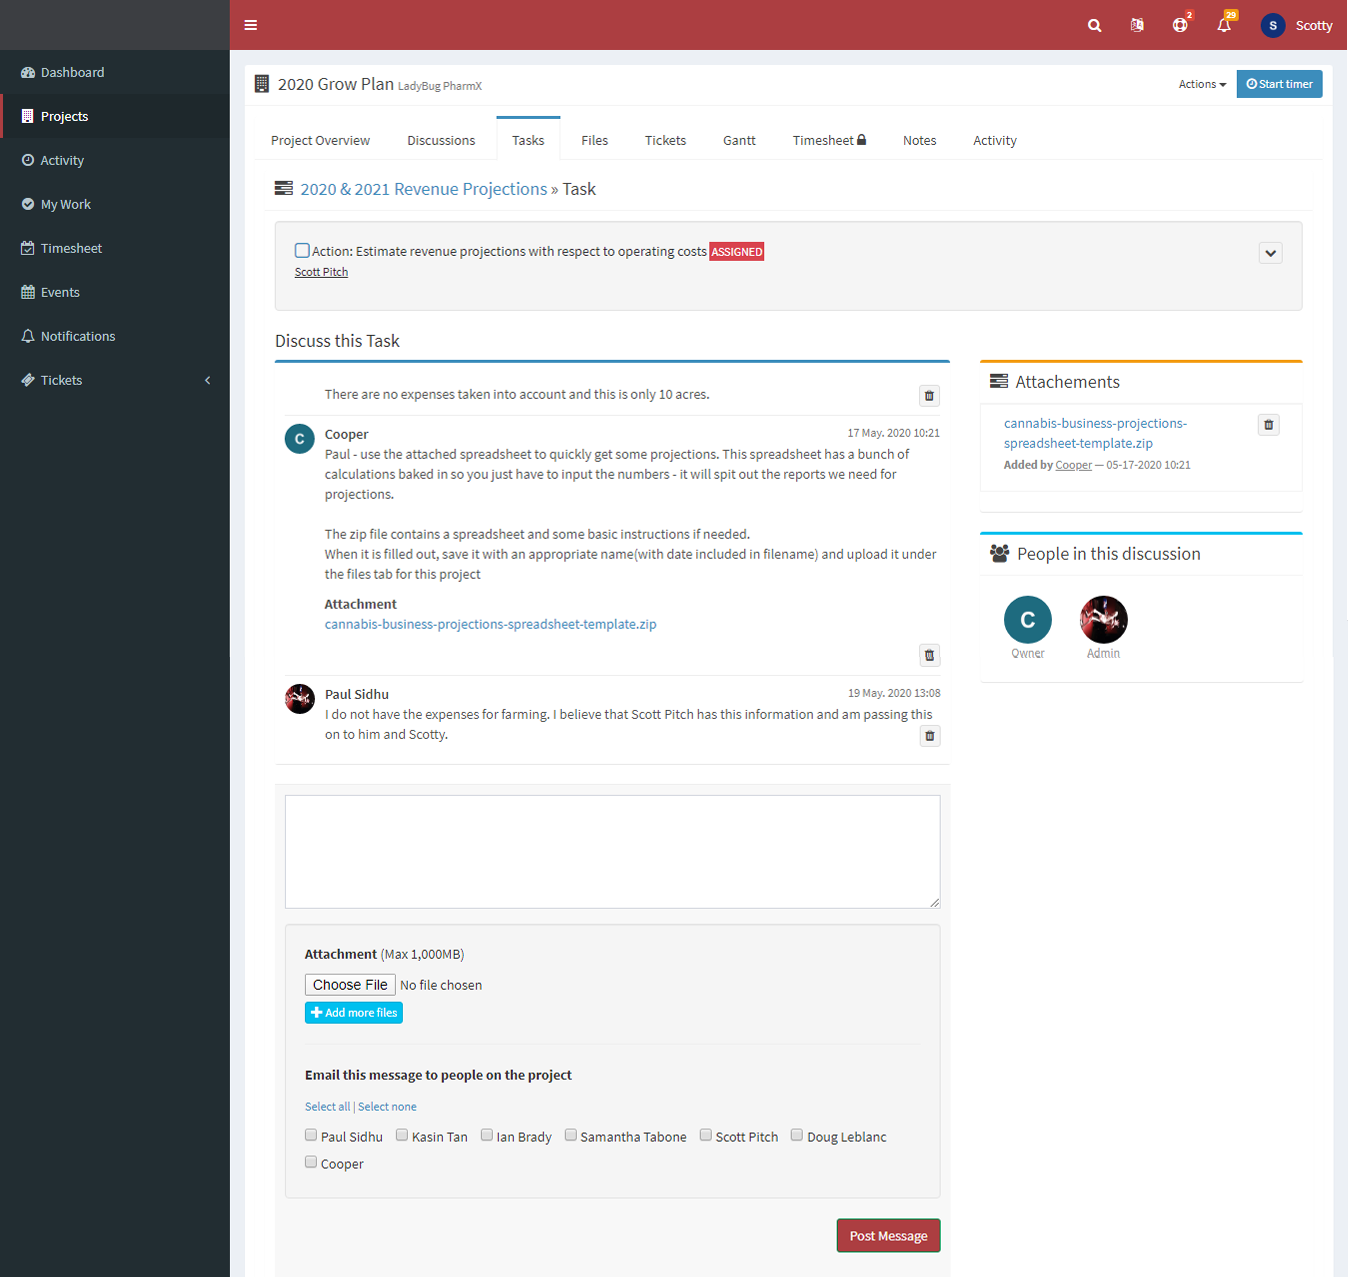
Contribute to a Task
Task Level Discussion: Discussions held here will be linked to the active Task. You can notify team members of any comments made.
Add Attachments: Click the Choose File button to locate any file from your computer and attach it to the active Task.
Files uploaded to a task will be associated with the task and accessible from the main files tab in the related Project.

Edit a Task
Choose edit task from dropdown found beside the Task title. When the pop up is displayed, make your changes to status , assignee etc. and re-save the task.
Completing a Task
Mark a Task complete by clicking the little box to the left of the Task title.
IMPORTANT: If you are marking a Task as COMPLETED, be sure to update the Task Status at the same time. (See above)
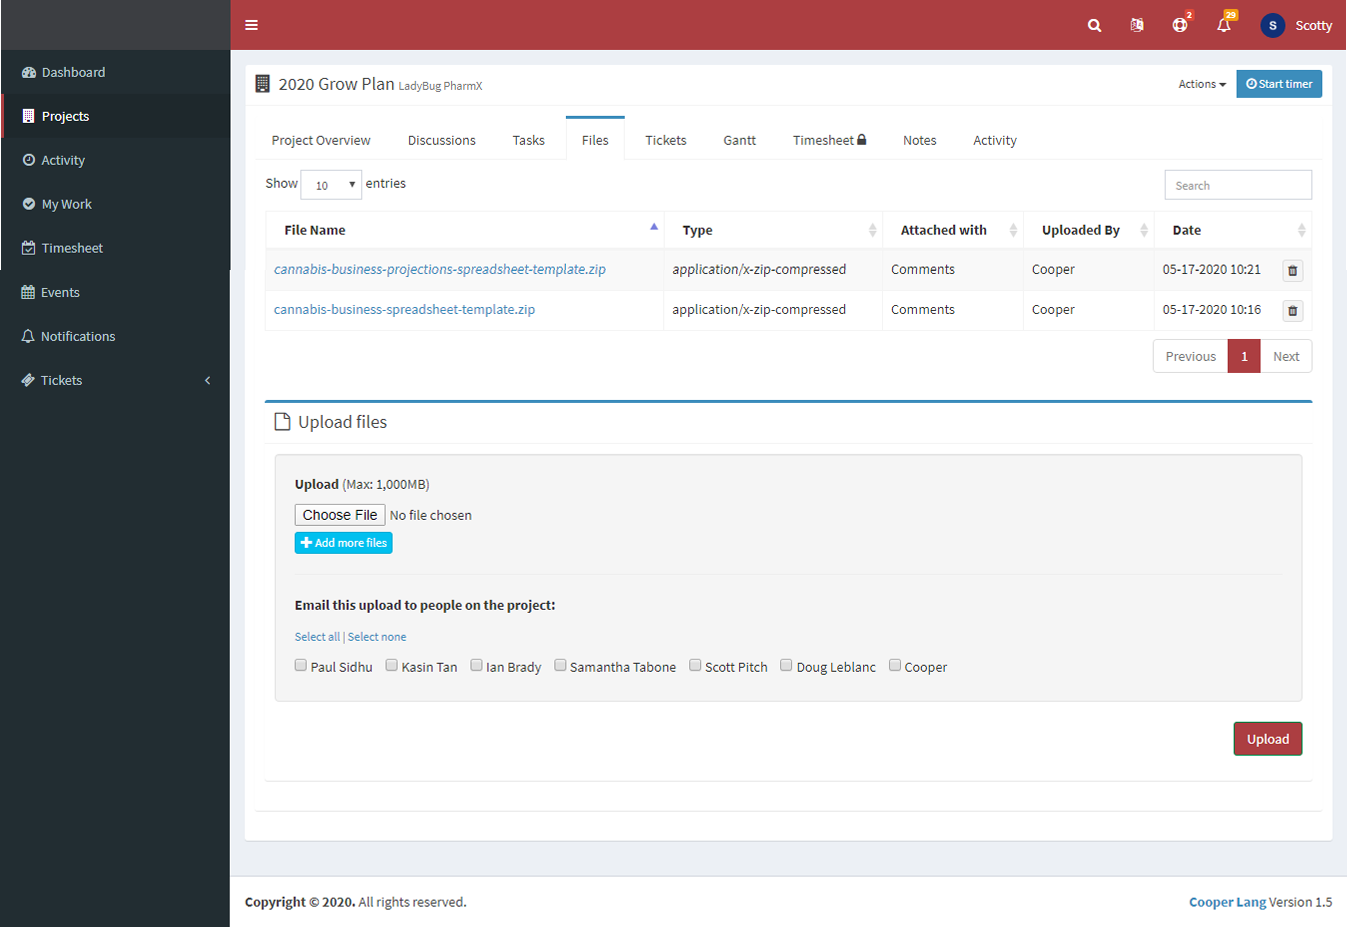
Project Files
Clicking on the Files tab brings up an overview of all files associated with the currently selected project.
Uploading an Attachment
Under the Uplaod Files heading, click the Choose File button to add an attachment related to the current project. Select the file from your computer and follow the on screen instructions. Add additional files if necessary.
Notify Team Members
Check off the names of any team members you would like to notify of your attachment / upload. The selected team will be sent an email alert with a link to the project details and the specific attachment.
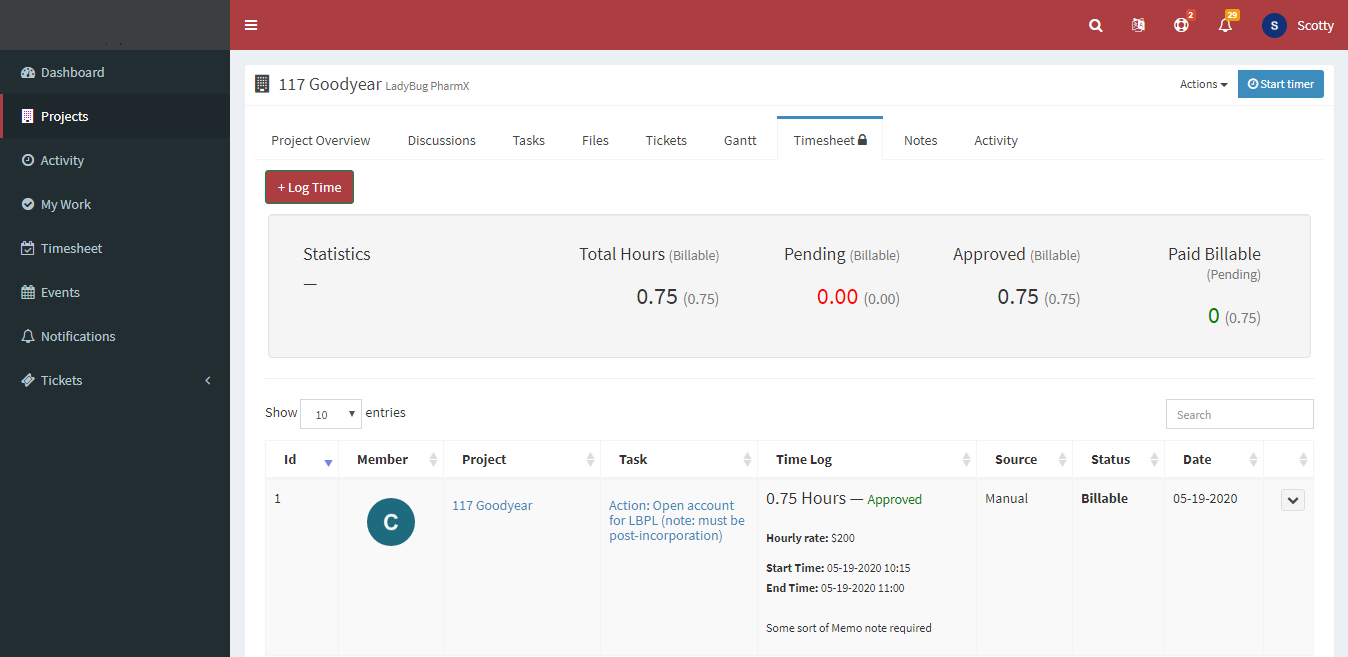
Timesheet - overview
Clicking on the Timesheet tab brings up an overview of all Time Records associated with the currently selected project.
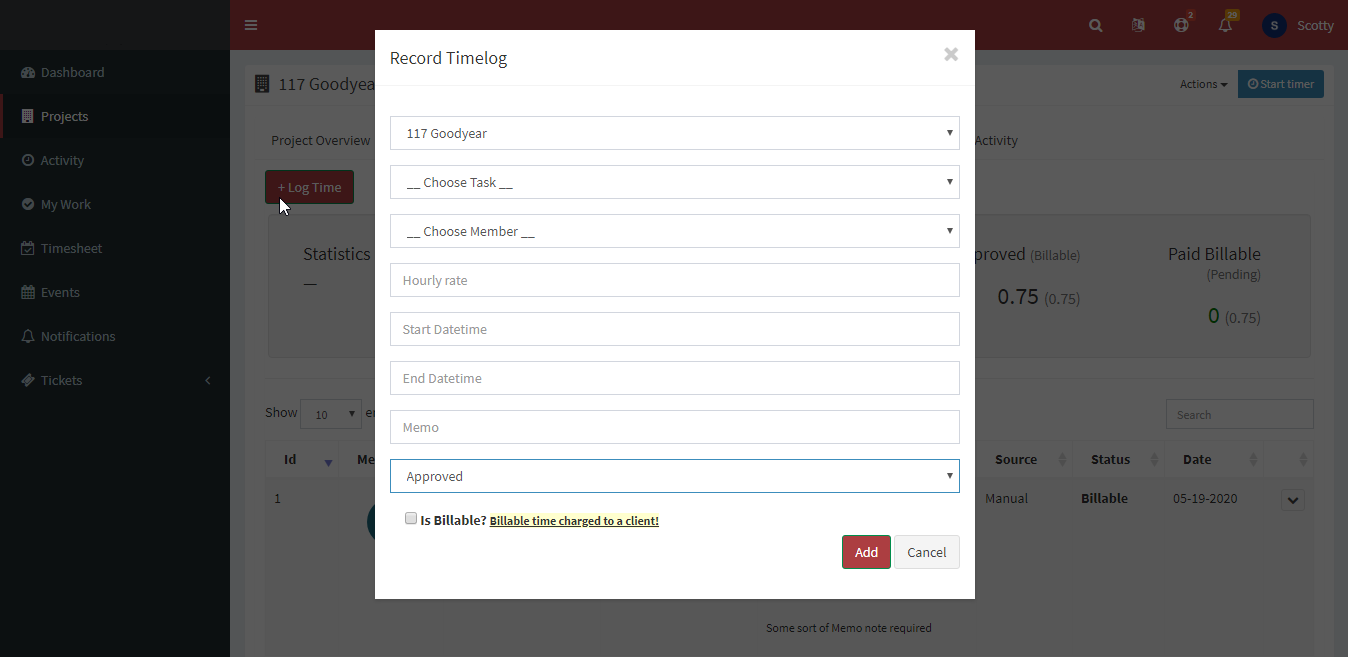
Record a Time Log
In the upper left corner of the dashboard you will see +Log Time button. Clicking this button will display a pop up with required fields for logging your time.
Project: When entering a Time Log from within a project, this field will be auto populated.
Task: Select the appropriate task from the drop down list.
Person: Select your name or the name of the person you are logging time for.
Hourly Rate: Enter your hourly rate if this is a billable task. Leave it as 1 for non billable hours.
Start / End Date: Log the appropriate start and end points for your activity.
Memo: Include any notes you may have for this Time Log in the memo field.
Approved: Choose status from Approved or Pending options in the list.
Billable: Ckeck the box beside Billable Hours
Starting a Timer
When viewing a projects details, you will find a Start Timer button in the top right corner of the dashboard. Click this button to begin a timer that tracks your activity time.
See HERE for more details
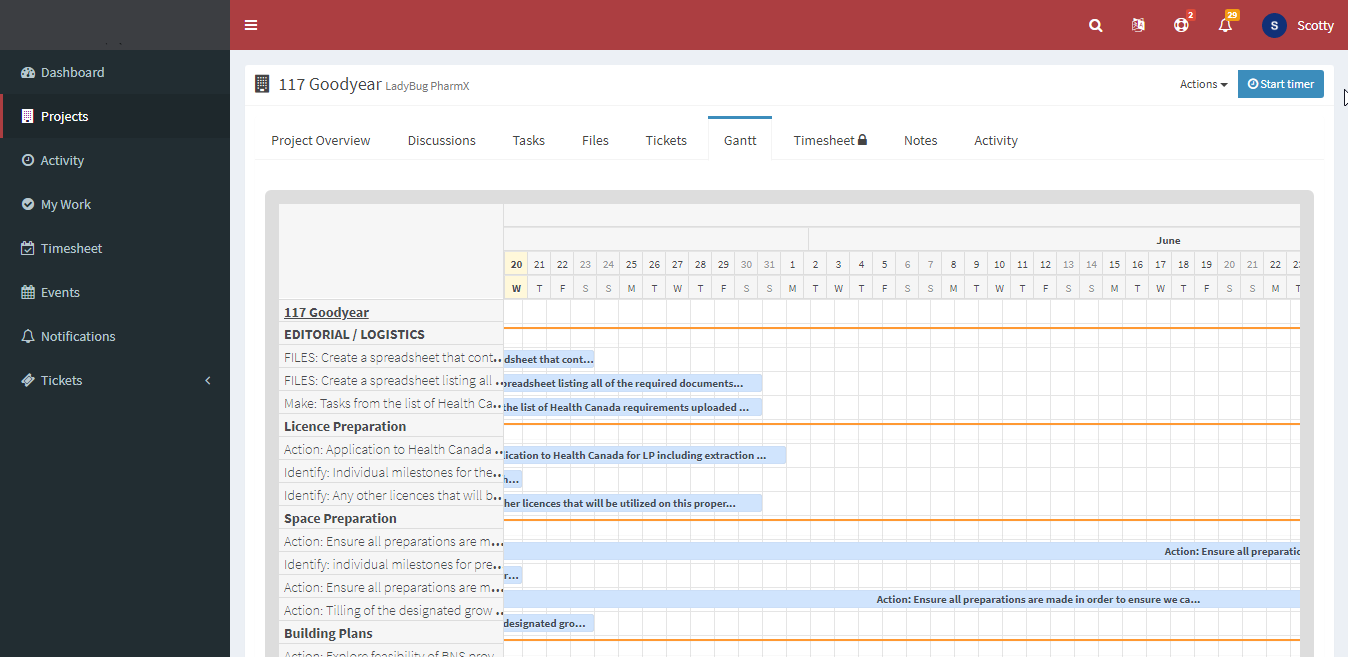
Gantt Charts
Clicking on the Gantt tab within a project brings up the Gantt chart with simple controls for adjusting your view.
A Gantt chart is a visual view of tasks scheduled over time. Gantt charts are used for planning projects of all sizes and they are a useful way of showing what work is scheduled to be done on a specific day. They also help you view the start and end dates of a project in one simple view.
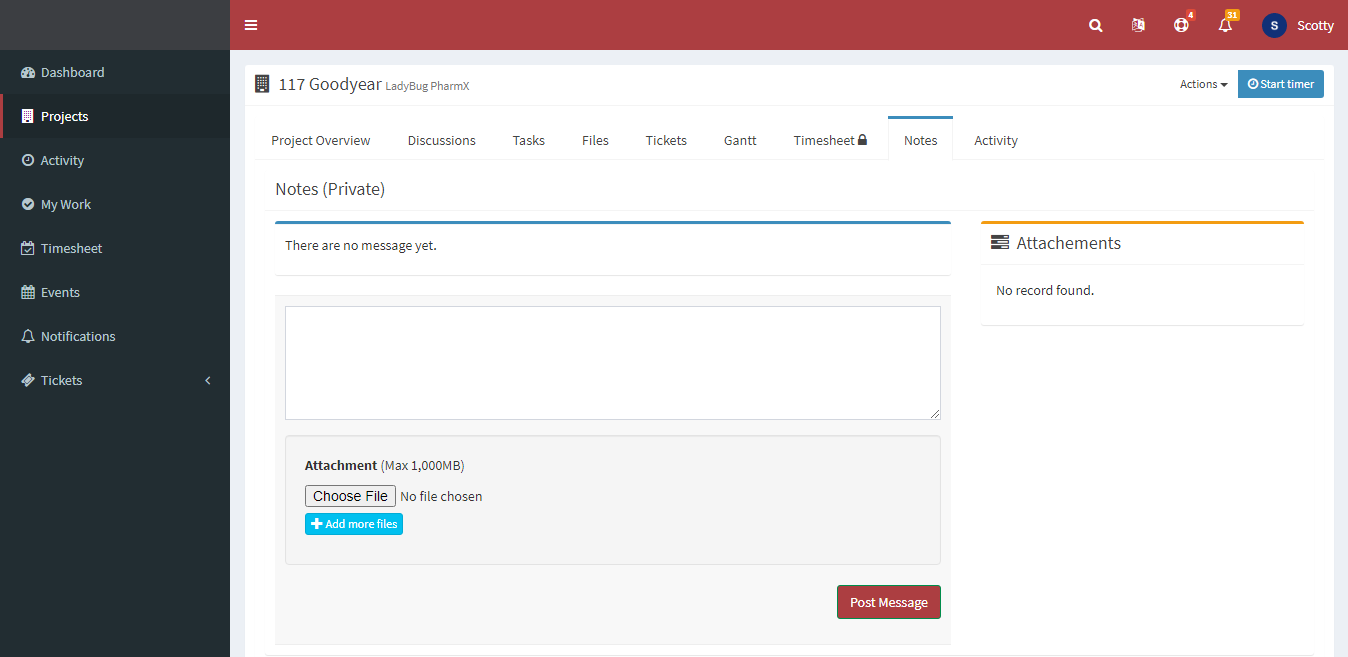
Private Notes
Clicking on the Notes tab within a project brings up a private area to make notes about the current project.
Use this area as a scratchpad if needed, to make project related notes for meetings or future conversations.
Use this area as storage for files that are "works in progress".
Editing Your Notes
Click on the title of any note you have left on a project to view it in detail.
Choose Edit from the dropdown beside the note title if you need to make any changes.
Click the Save button to submit your changes.
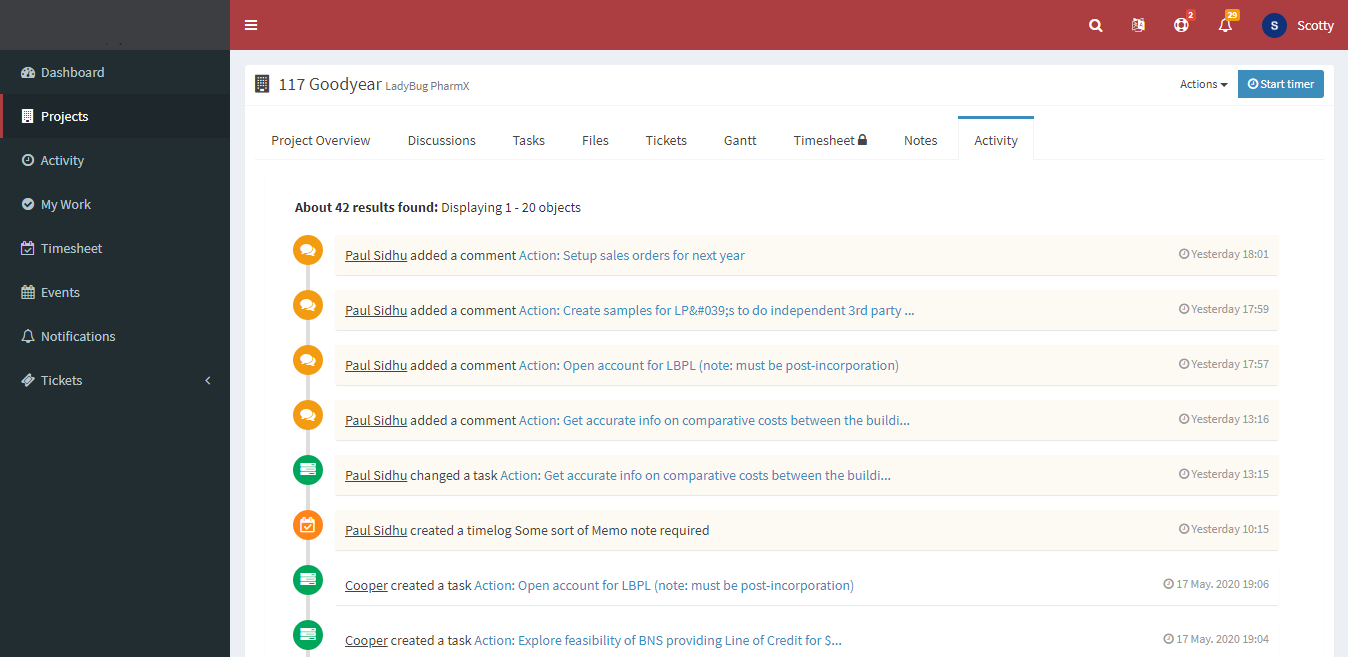
Activity
In this section you will find a chronological listing of all activity for the current project. Each activity listed is linked to the related Task or Ticket.
Click the associated link to view more detailed information.
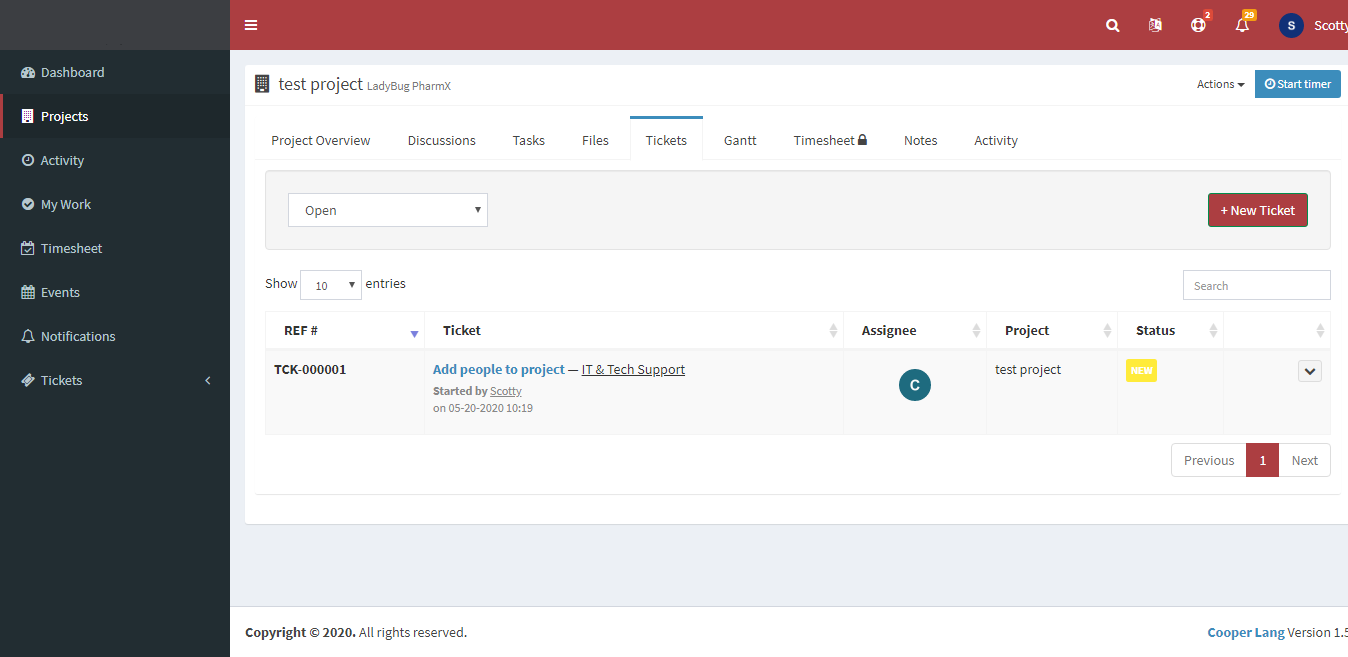
Clicking on the Tickets tab brings up a list of Tickets associated with the project you are viewing.
Click on the title of any Ticket to view it's details.
Editing Your Notes
Click HERE for more information about creating and editing Tickets.
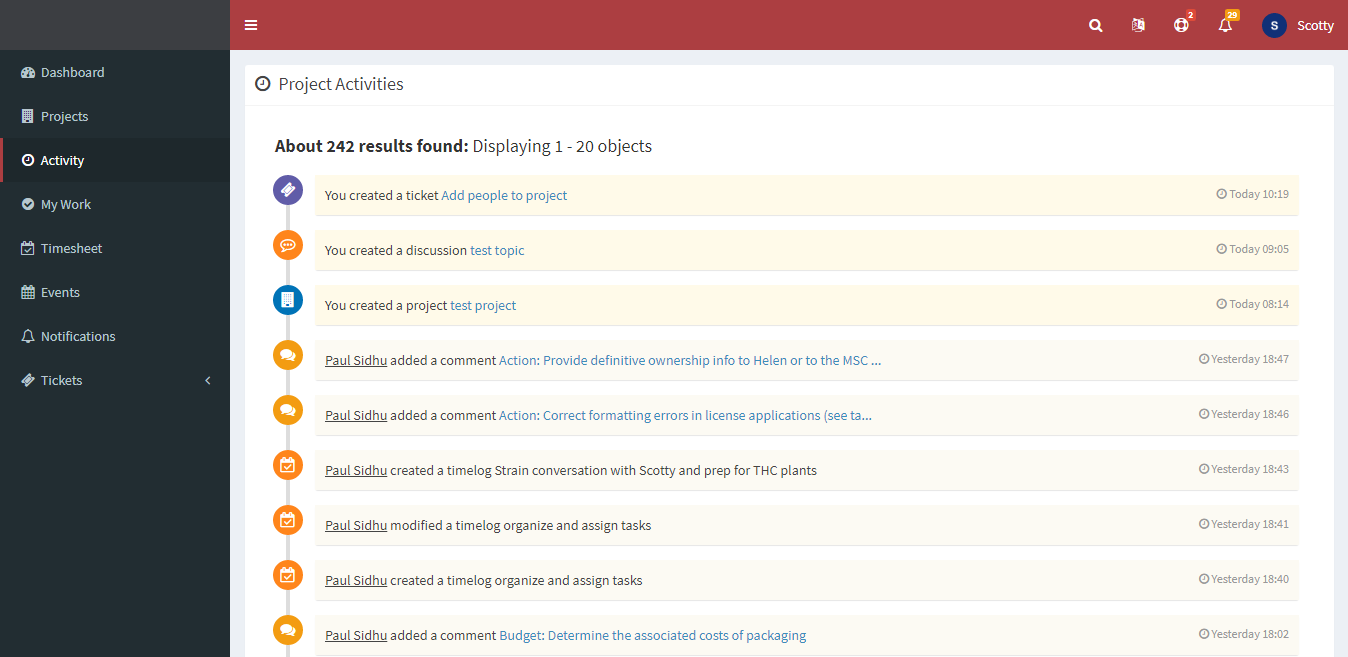
All Activity
In this section you will find a chronological listing of all Activity for all projects you are assigned to. Each activity listed is linked to the related Task, Project or Ticket.
Clcik the associated link to view more detailed information.
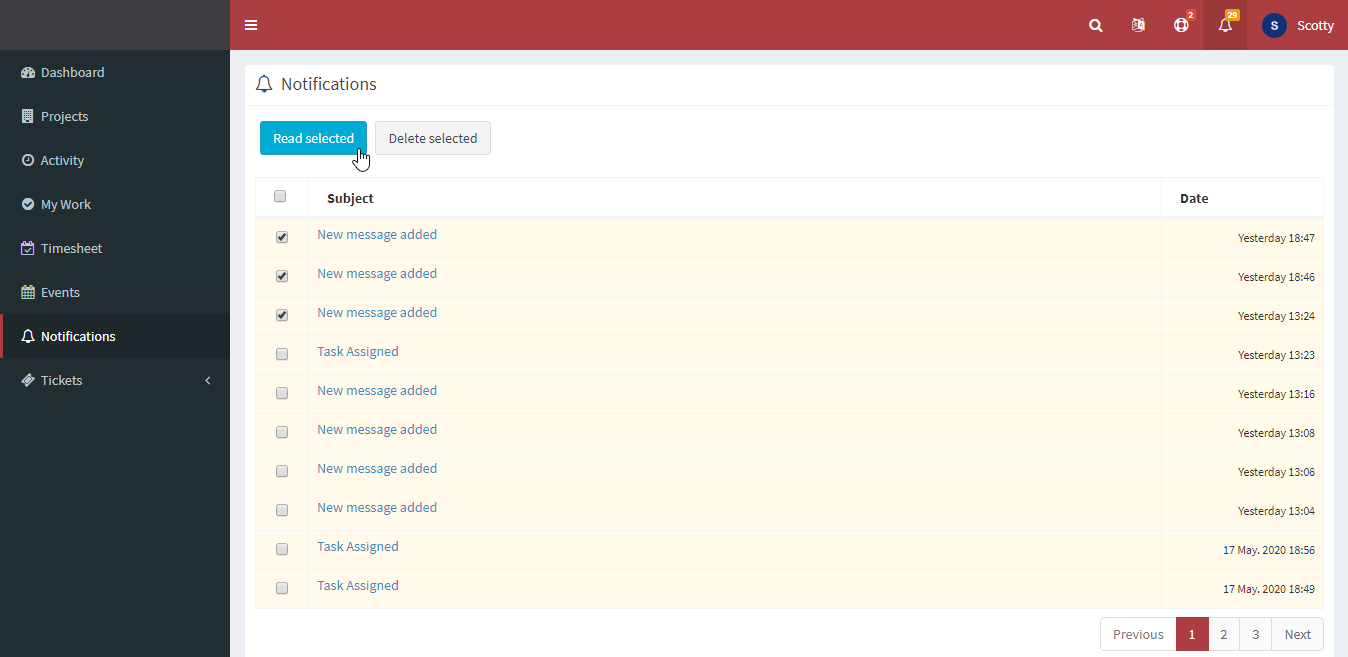
All Notifications
In this area you will find a list of all notifications sent to you through the Task Management Platform.
You have the option to read them one by one or open in groups.
Work Record
In this area you will find a listing of all Tasks and Tickets assigned to you. Each task is listed along with it's associated Task List and Project. Click on any or the related links to view more detail.
On the right side of all tasks, you will find the Tasks due date for quick reference, as well as a dropdown which allows for editing that Task or moving it to the trash.
*Keep in mind proper etiquette when chosing to move an item to the trash. Only delete items that you have created*

Recorded Time
In this area you will find a transcript of all recorded time from team members related to your assigned projects. Each record is listed along with links to it's associated Task and Project. Clicking on those links will provide more detail.
You can edit a time record by selecting edit from the dropdown menu on the right side of the record.
Filtering Options
At the top of the dashboard, you will see options for filtering the records. You have the option of filtering by a speifc project using the drop down menu on the left side of the screen.
Alternately, you can filter records by specific date range. To do so, enter the start and end dates and click the Apply button on the right side of the page.
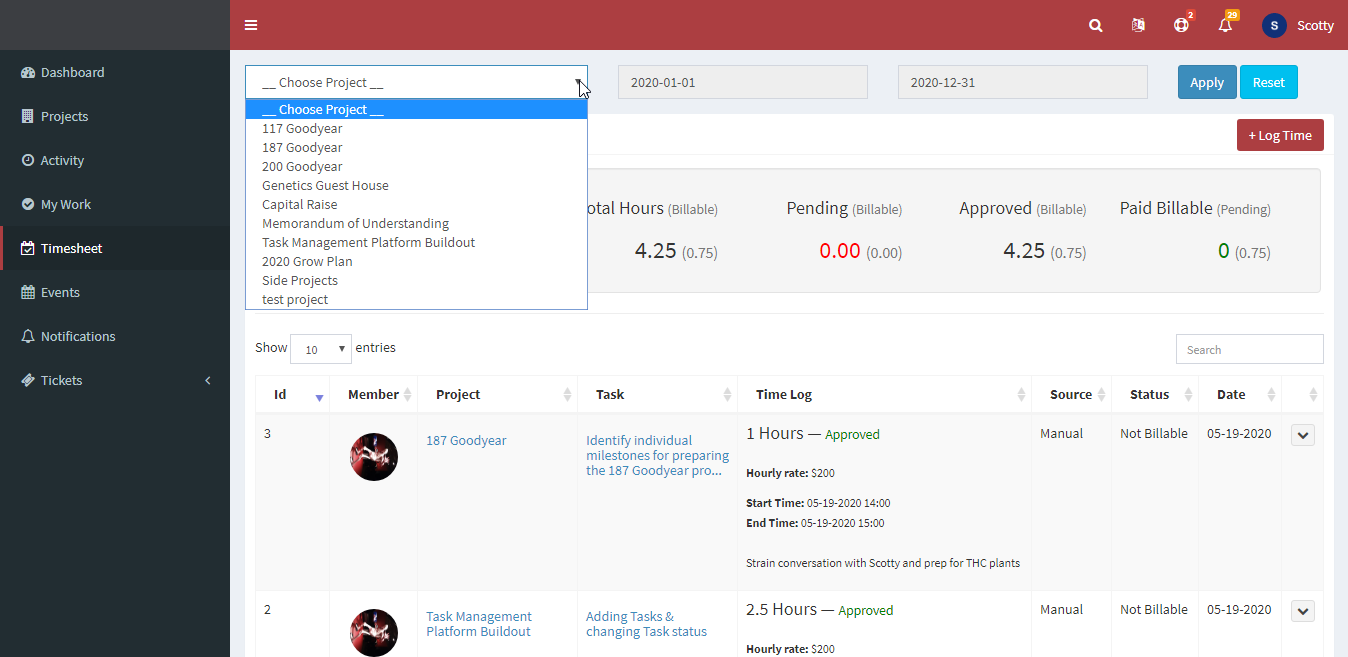
Logging Your Time
In the upper left corner of this area, you will find the Log Time button. You can click this button to bring up the time card.
- Click the Log Time button
- Choose the appropriate project from the drop down list
- Choose the appropriate associated task
- Choose your name from the drop down list
- Enter your rate of pay (hourly if applicable or classified as a billable task)
- Choose your starting date and time as well as your ending date and time for the session being logged
- Include any important information in the memo colulm
- Select a status of either "Approved" or "Pending"
- Check the box beside Billable Hours if this record requires
- Click the Add button to submit your recorded time
Tickets
In this area you will find a record of all Tickets assigned within the Task management System. The title of each ticket is linked. Clicking on those links will provide more detail.
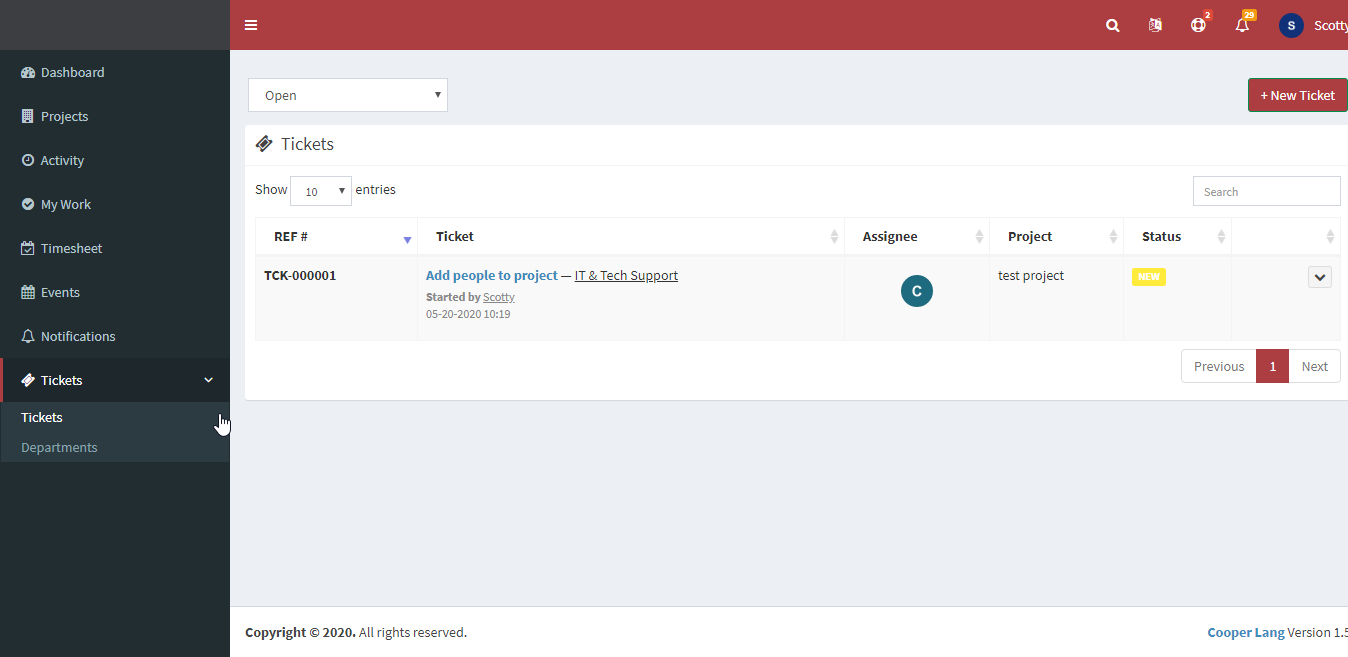
Filtering Options
At the top of the dashboard, you will see options for filtering the tickets view. You have the option of filtering by Open Tickets and Closed Tickets.
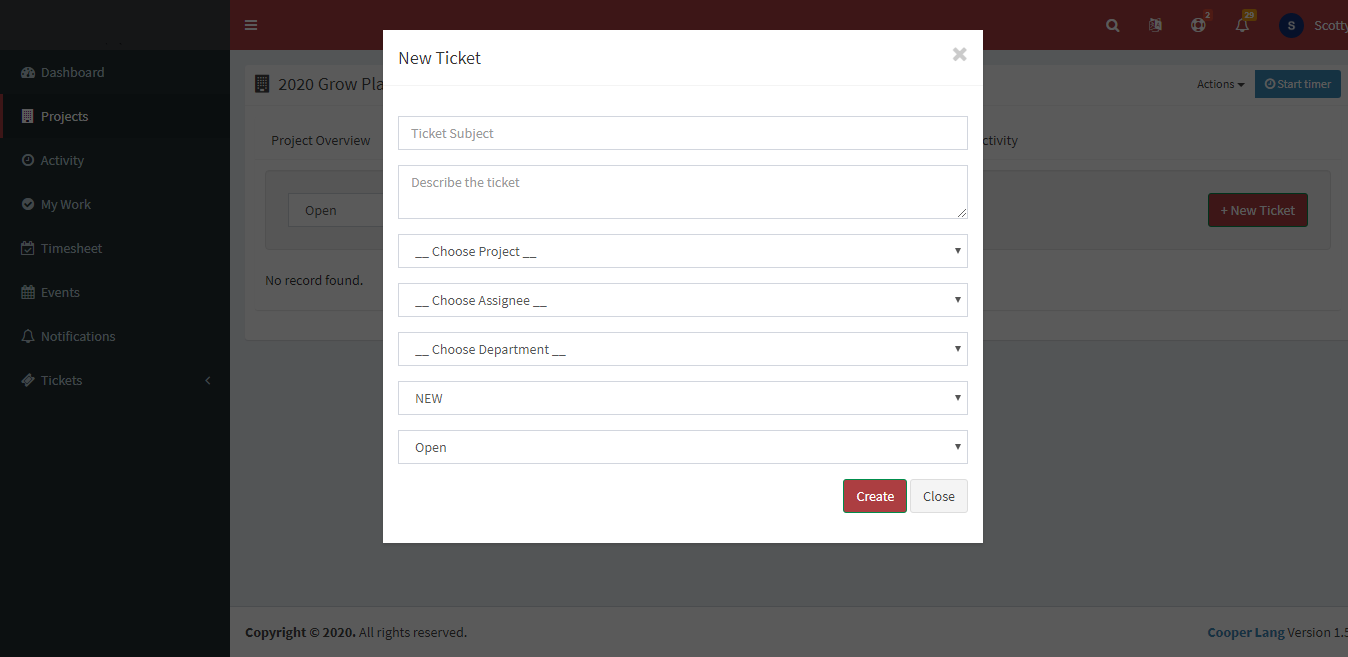
Opening a Ticket
In the upper right corner of this area, you will find the New Ticket button. You can click this button to bring up the entry form.
- Click the New Ticket button
- Enter the Subject of the ticket
- Describe the Ticket. Provide a detailed description of the issue or action required
- Choose a project to assign this ticket to
- Choose a member to assign the ticket to
- Choose a department to assign the ticket to. Avoid creating new departments unnecessarily
- Click the Create button to submit your ticket and notify the appropriate team member
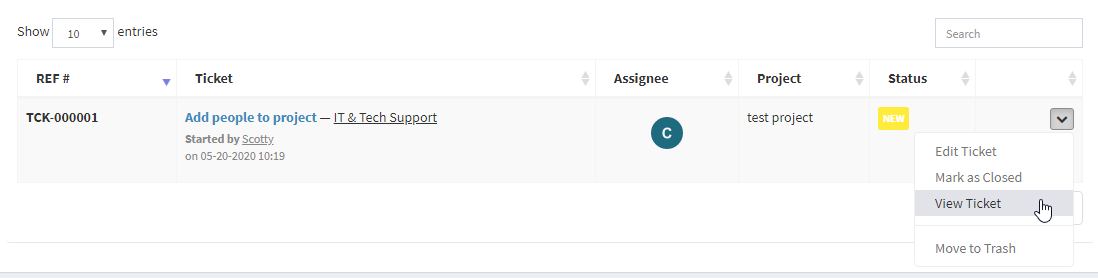
Editing a Ticket
You can edit a Ticket by selecting edit from the dropdown menu on the right side of the record.
When you are assigned a ticket, you should edit the Ticket Status to reflect your activity. Eg. Change status from NEW to IN PROGRESS
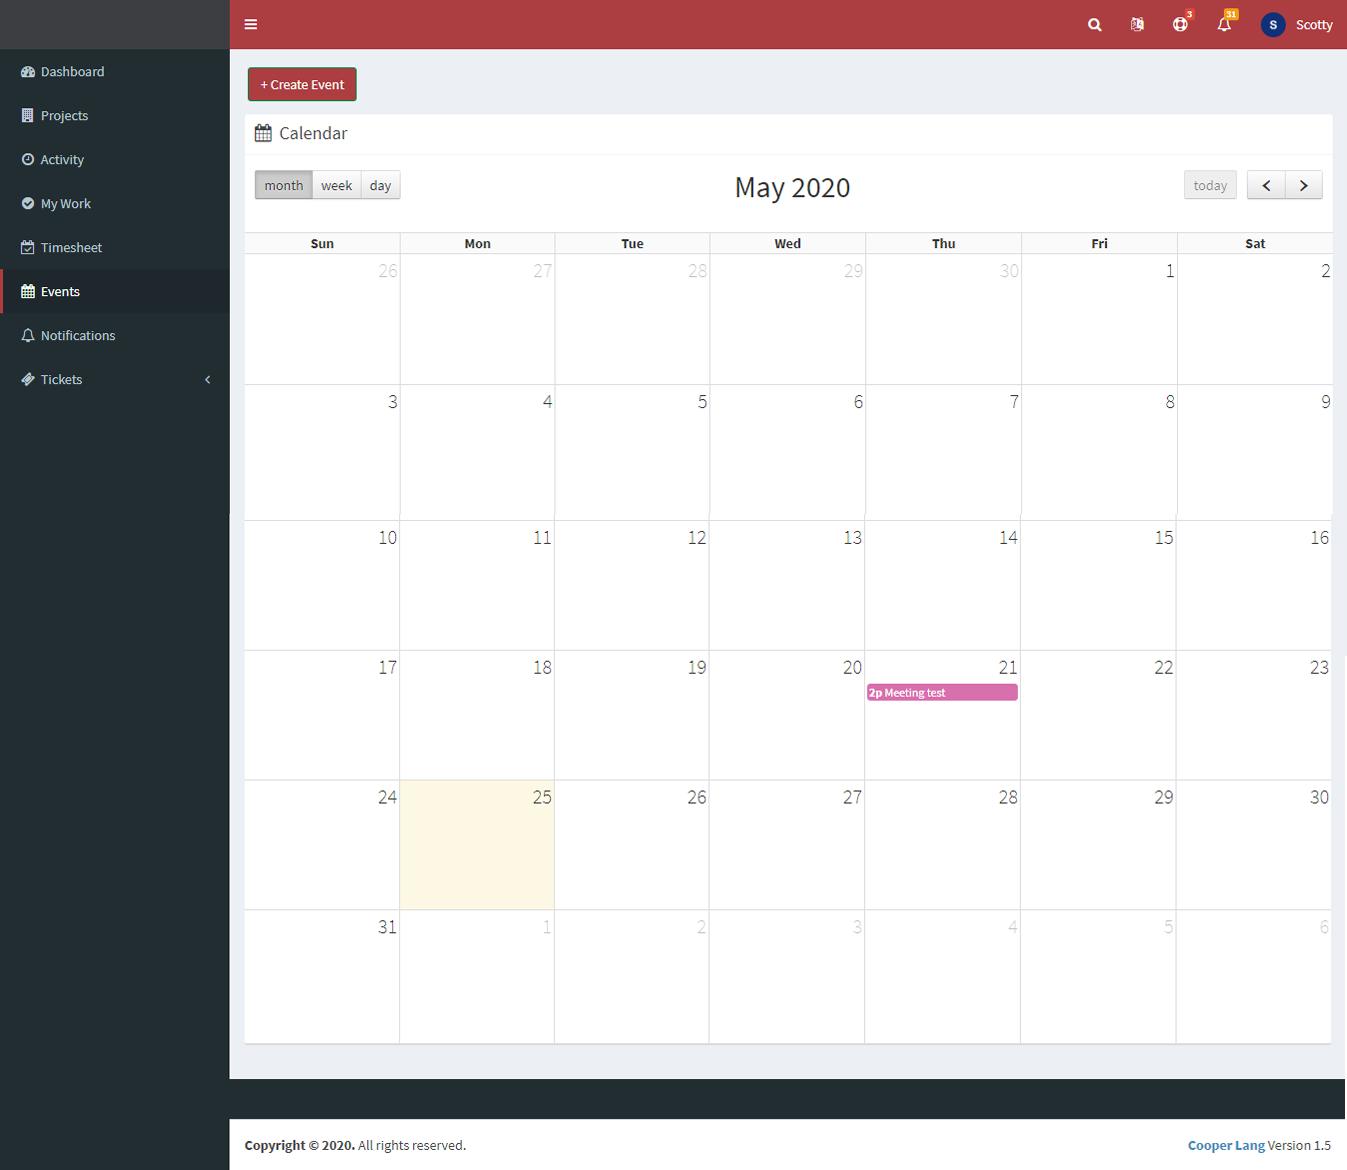
Events
The events area is presented as a calendar which can be scrolled from month to month. All events that you have created or have been scheduled to attend will be visible in this calendar view. Clicking on an item will bring up details of the event.
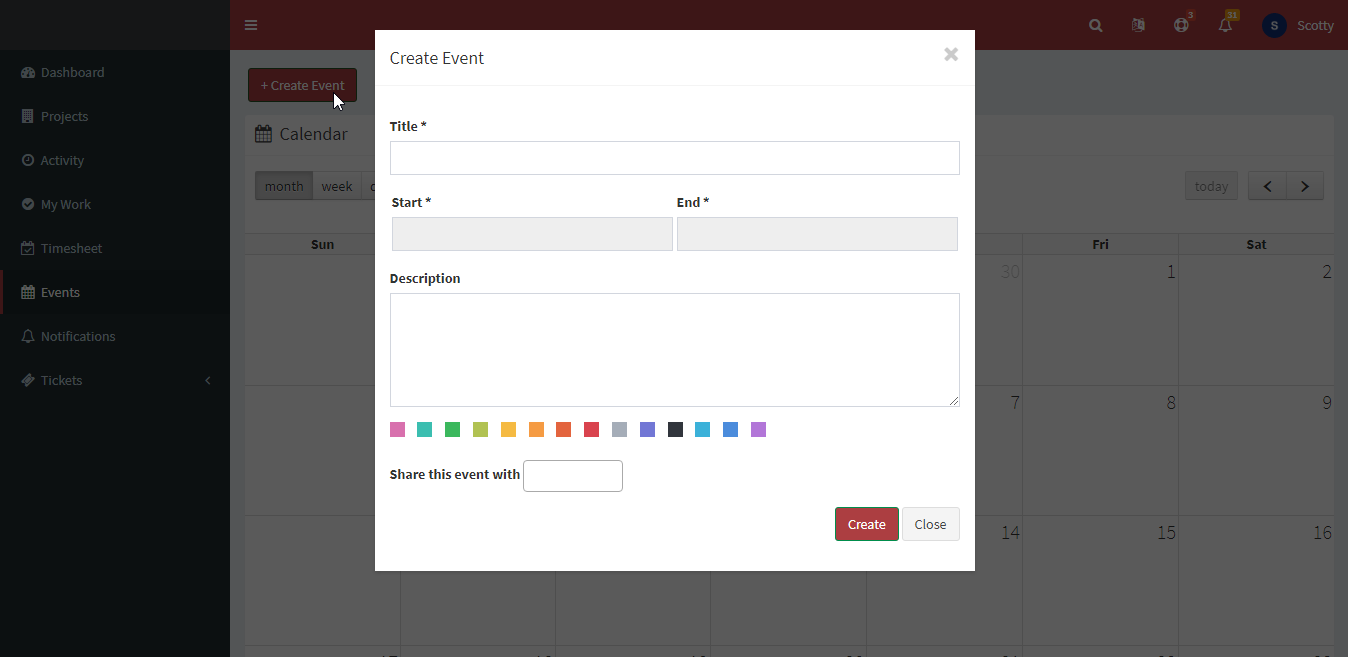
Create an Event
To schedule a new event, click the Create Event button. You will be prompted to enter some information and invite team members to attend.
- Click the Create Event button
- Enter the event title
- Enter the start date and time for the event
- Enter the end date and time for the event
- Enter a description of the event and include any necessary phone numbers, access codes, links a participant might need
- Choose which team members to include in the event
- Click the Create button to submit your new event